Flik-o-meter: checking what the screen really shows
An SSVEP experiment rests on one assumption: that each target flickers at exactly the frequency the design says. The flik-o-meter is how you check it. It is a small light sensor you hold against the monitor; it reads the light from one target, and the toolbox works out the frequency the screen actually produced and compares it with the design.
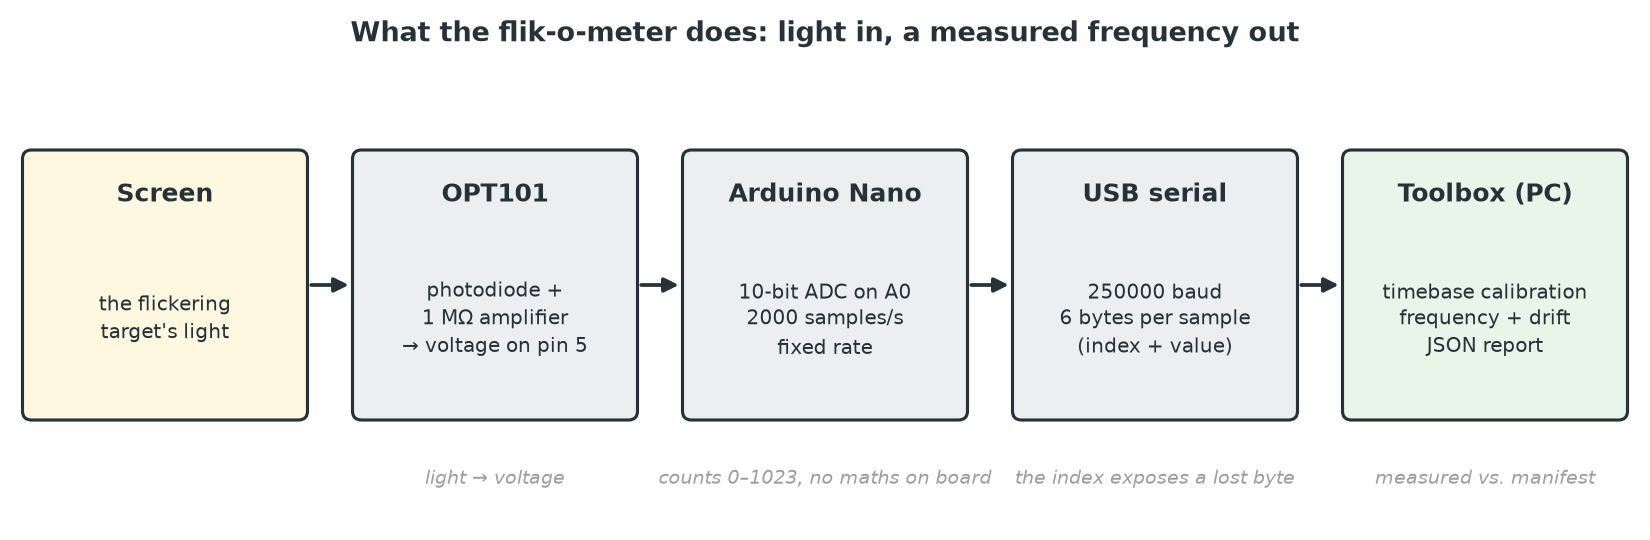
The problem it solves
The toolbox's renderer counts frames and reports any it dropped, but that only says the program kept time. It cannot say what the screen emitted. Between the two sit the graphics driver, the operating system's compositor, the monitor's own processing and its refresh rate, and any of them can change the flicker without the program knowing:
- a monitor running at a different refresh rate from the one you set, so every frequency is off;
- a frequency that does not divide evenly into the refresh rate, which the screen can only approximate;
- dropped or repeated frames that make the flicker wander;
- a pattern-reversal stimulus (a checkerboard or grating) that does not actually reverse fully;
- a delay between the moment the toolbox marks "stimulus on" in the recording and the moment light actually appears, which matters for any analysis that depends on timing or phase.
The analysis never assumes the nominal frequency was shown without a check like this on the real hardware.
What it measures
- Frequency: the flicker frequency of each target, to within ±0.1 Hz, from about 8 Hz to 100 Hz.
- Stability: how far the flicker's timing wandered during the measurement (phase drift, in milliseconds).
- Signal quality: whether the capture actually contains the flicker, so a sensor that slipped off the target cannot produce a false pass.
- Modulation depth (optional): how deep the flicker is, relative to a dark reference taken with the screen black. This is in the sensor's own units, not perceived contrast.
- Marker-to-light latency (with an EEG amplifier): the delay from the stimulus marker to the light, measured in a recording.
It is not a light meter: it does not measure luminance or perceived contrast (see Calibration).
When you need it
- Before collecting data on a new display or a new PC, and after a graphics driver or display-setting change.
- When a design uses new frequencies, especially high ones or ones that do not divide evenly into the refresh rate.
- When a design uses pattern reversal or picture stimuli, whose flicker you cannot judge by eye.
- When you need to know the stimulus timing in the recording itself.
A full check of a design takes a few minutes: one minute of automatic calibration, then a few seconds per target.
The pages in this section
| Page | What it covers |
|---|---|
| Build guide | Parts list, schematic, breadboard prototype, final build and firmware. |
| Using it | Step by step: checking a design's flicker, the options, pattern-reversal stimuli, and measuring latency from a recording. |
| Calibration | What the toolbox calibrates by itself, what you set up by hand, and what cannot be calibrated. |
| Interpreting results | What the report says, which values are good and which are not, and what to do about each. |
| Technical reference and troubleshooting | How the analysis works, the thresholds, the latency extraction in detail, and a troubleshooting table. |